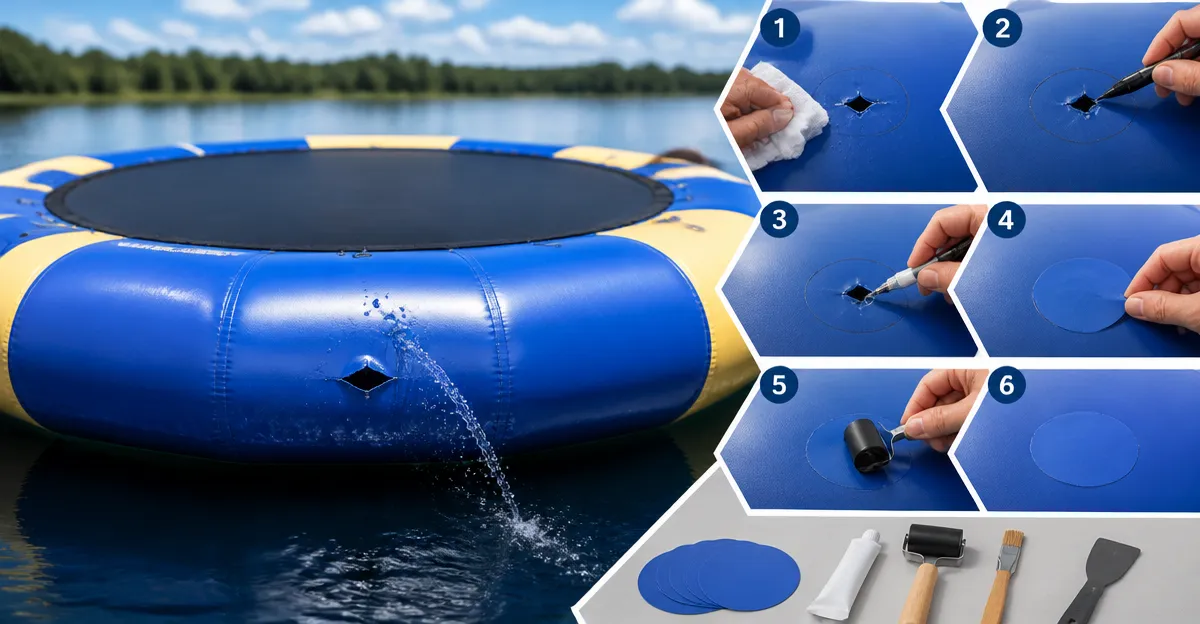
How to Repair a Punctured Water Trampoline: Step‑by‑Step Patch, Seal & Prevent Leaks
Introduction
Water trampolines provide hours of summer enjoyment, yet a small puncture can quickly turn fun into frustration. This guide teaches readers how to locate, clean, patch, and seal a leak so the trampoline regains its buoyancy and safety. By following the systematic process, one can avoid costly replacements and extend the life of the inflatable.
The instructions are written for an intermediate DIY audience; no specialized training is required, only a few tools and patience. Each step explains the rationale behind the actions and highlights the most effective products available on Amazon.
Readers will finish the guide with a fully repaired trampoline, a set of best‑practice maintenance habits, and confidence to tackle similar inflatable repairs in the future.
What You’ll Need
- Clean, lint‑free cloths
- Mild soap and water
- Isopropyl alcohol wipes (optional for stubborn residues)
- Scissors or a utility knife
- Measuring ruler
- Heavy‑weight object (e.g., a book) to press the patch
- Repair tools – see product recommendations below
The repair tools are optional but dramatically improve the durability of the fix. Each recommended product is linked the first time it appears.
Step 1: Assess the Damage
Begin by inflating the trampoline to its normal pressure. Observe the surface for visible tears, pinpricks, or areas where air escapes. If the leak is not obvious, submerge the inflated trampoline in a shallow pool and look for bubbles. Mark the exact location with a waterproof marker or a piece of tape.
Understanding the size and shape of the puncture determines which patch size is appropriate. Small pinpricks require a tiny square patch, while larger tears benefit from a longer roll that can be cut to fit.
Step 2: Clean the Surface Thoroughly
Surface preparation is the most critical factor for a lasting repair. Use a mild soap solution and a soft cloth to remove dirt, sunscreen, or algae. Rinse with clean water and dry completely with a lint‑free towel.
For residues left by previous adhesives, apply a small amount of isopropyl alcohol on a wipe, let it evaporate, and then wipe again with a dry cloth. A clean, dry surface ensures the adhesive on the patch adheres without air bubbles.
Step 3: Choose the Appropriate Patch Material
For most water trampoline repairs, a flexible, waterproof TPU patch offers the best combination of strength and elasticity. The Birllaid Inflatable Patch Repair Kit includes a 3.15 in × 7 ft roll that can be trimmed to any shape. Its TPU material is temperature‑resistant, waterproof, and adheres firmly without peeling, even after repeated inflations.
Key specifications: price $12.98, rating 4.2 / 5 from 992 reviews, and it works on bounce houses, pools, tents, and other inflatables. The roll format is ideal when the puncture is larger than a few centimeters because it can be cut to cover the entire damaged area with overlap.
If you prefer pre‑cut patches, the Breliter Inflatable Patch Repair Kit provides ten 2.5 in × 2.5 in squares. This kit is inexpensive ($6.99) and rated 4.3 / 5, making it a convenient backup for quick fixes.
Step 4: Prepare and Cut the Patch
Measure the puncture and add at least 1 cm of margin on all sides. Using clean scissors, cut a piece from the Birllaid roll or a square from the Breliter kit that meets the dimensions. The extra margin allows the adhesive to bond to undamaged material, creating a seal that can stretch with the trampoline.
When cutting a roll, make a straight cut to avoid jagged edges that could catch on the fabric. If the tear is irregular, cut a slightly larger patch and trim the excess after the adhesive has set.
Step 5: Apply the Patch
Peel the protective backing from the TPU patch to expose the self‑adhesive side. Align the patch carefully over the marked area, ensuring no air bubbles are trapped. Press firmly with your fingers, then place a heavy book on top for at least 30 minutes. The pressure expels any remaining air and promotes a uniform bond.
For larger repairs, consider using the Breliter Waterproof Inflatable Repair Tape. This 4 in × 6.6 ft roll is thicker than standard patches, providing extra durability for high‑stress seams. It costs $9.99, has a rating of 4.3 / 5, and is praised for its strong adhesion even in hot weather.
After the patch is in place, avoid inflating the trampoline for at least 12 hours, as recommended by the manufacturer. This curing time allows the adhesive to reach full strength.
Step 6: Seal and Cure
Once the patch has adhered, inspect the edges for any gaps. If a gap is visible, apply a thin strip of the Breliter tape over the seam to reinforce the seal. The tape’s weather‑resistant properties protect the repair from UV exposure and water pressure.
Allow the entire repair to cure for the full 12‑hour period before reinflating. During this time, store the trampoline in a shaded, dry area to prevent premature exposure to sunlight, which could soften the adhesive.
Step 7: Test for Leaks
Reinflate the trampoline to its normal operating pressure. Submerge the repaired section in a shallow pool or use a soapy‑water spray to watch for bubbles. If bubbles appear, deflate, re‑apply pressure to the patch, and repeat the curing process.
When no bubbles are observed, the repair is successful. Conduct a final visual inspection for any loose edges or visible wear before allowing children to use the trampoline.
Step 8: Prevent Future Leaks
Regular maintenance reduces the likelihood of future punctures. After each season, clean the trampoline with mild soap, dry thoroughly, and store it in a climate‑controlled environment. Apply a thin layer of the T-REX Waterproof Pool Repair Tape along high‑stress seams as a preventative measure. This clear tape ($10.20, rating 4.2 / 5) adheres to wet surfaces and can be applied without removing the trampoline from its storage bag.
Inspect the trampoline before each use, paying special attention to areas near anchor points, seams, and any exposed edges. Promptly address minor abrasions with a small patch to avoid larger tears.
Tips & Pro Tips
- Temperature matters: Apply patches when ambient temperature is between 60 °F and 80 °F. Extreme cold can reduce adhesive flexibility, while extreme heat may cause premature curing.
- Use a scraper: The Birllaid kit includes a small scraper that helps remove trapped air bubbles after the patch is placed.
- Layering technique: For very large holes, apply two overlapping patches. The first patch covers the central area, and the second overlaps the edges to reinforce the seal.
- Avoid over‑application of adhesive: When using the EPN Air Mattress Patch Kit, a thin layer of solvent‑based glue is sufficient. Excess glue can soften TPU material.
- Safety first: Wear gloves when handling solvent‑based adhesives to prevent skin irritation.
Troubleshooting
| Problem | Possible Cause | Solution |
|---|---|---|
| Patch lifts after 1 hour | Surface not completely dry or oily residue | Re‑clean area with isopropyl alcohol, dry thoroughly, and re‑apply patch. |
| Air bubbles under patch | Insufficient pressure during application | Press patch with a flat weight for at least 30 minutes; use a scraper to smooth bubbles. |
| Adhesive hardens before curing | High ambient temperature | Apply patch in a cooler environment or work in short intervals. |
| Patch color mismatch | Using a clear patch on dark material | Choose a colored patch (e.g., blue from EPN kit) that matches the trampoline surface. |
Conclusion
Repairing a punctured water trampoline is a straightforward process when the correct preparation, tools, and techniques are employed. By following the eight steps outlined above, one can restore buoyancy, ensure safety, and avoid the expense of a replacement. Regular inspection and preventative tape applications further protect the inflatable from future damage.
Armed with the recommended repair kits and a disciplined maintenance routine, readers will enjoy many more seasons of safe, splash‑filled fun.
Products Mentioned in This Guide
Frequently Asked Questions
How can I locate a small puncture in a water trampoline?
Inflate the trampoline and submerge it in water watching for bubbles, or spread soapy water on the surface and look for escaping foam.
What type of patch material works best for water trampoline repairs?
Use a vinyl repair kit with a self‑adhesive patch designed for inflatable pools that matches the trampoline’s thickness.
Do I need to clean the area before applying a patch?
Yes, wash the spot with mild soap and water, dry it, then wipe with isopropyl alcohol to remove residue.
How long should I press the patch to ensure a strong seal?
Press a heavy object on the patch for 10‑15 minutes, then let the adhesive cure for 24 hours before refilling.
What maintenance steps can prevent future leaks?
Regularly inspect for sharp objects, keep the trampoline away from rough surfaces, and store it dry in a protective bag.