Introduction
This guide explains how to secure a water trampoline on lakes, rivers, and pools so that users enjoy safe, reliable bounce without drifting. Readers will learn the essential equipment, the proper sequence of actions, and the common pitfalls that cause accidents. The information is applicable to a wide range of inflatable platforms, from large 17‑foot family models to compact 10‑foot backyard versions. By following the steps, one can protect both the investment and the participants.
What You Will Need
- Heavy‑duty anchor bags or concrete blocks
- Stainless‑steel D‑rings or eye bolts (usually supplied with the trampoline)
- High‑strength mooring ropes (minimum 12 mm diameter)
- Adjustable ratchet straps or cam‑buckles
- Portable electric pump (included with many models)
- Measuring tape, marker, and a level
Optional but useful items include a handheld depth gauge for river currents and a wind‑speed meter for windy days. The following product recommendations provide ready‑made solutions for most of these needs.
Step 1: Choose an Appropriate Anchoring Location
Select a site where the water depth is at least eight feet and the bottom is free of sharp objects. Avoid areas with strong currents, heavy boat traffic, or sudden drop‑offs, because these conditions increase the risk of the trampoline breaking free. Mark the intended position with a floating buoy or a temporary rope line to verify spacing before inflation. The location should allow a clear perimeter of at least three meters around the trampoline for safe entry and exit.
Step 2: Gather Anchoring Materials
For most lake and pond installations, the Island Hopper 17' Water Bouncer is an excellent reference because it ships with six D‑rings and recommends the use of heavy anchor bags. The product’s heat‑welded PVC construction and 1,000 lb capacity ensure that the anchor points will not tear under load. Its price of $1,928.00 and rating of 4.3 / 5 from nine reviews indicate a premium, durable option for large families.
For budget‑friendly setups, the IDEALHOUSE Water Trampoline includes heavy‑duty anchor bags, ropes, and a 600 W electric pump. At $346.00 and a rating of 1 / 5 (one review), the product offers a complete anchoring kit despite mixed feedback on overall quality. The anchor bags are designed to sink quickly, providing a stable base even in moderate currents.
If a flexible mooring system is preferred, the GIRISHIP Water Trampoline supplies reinforced mooring ropes and two D‑rings per unit. Its price of $239.00 and perfect 5 / 5 rating from two reviews demonstrate high customer satisfaction for durability and ease of use. The included ropes are rated for up to 800 lb loads, making them suitable for larger lakes.
Step 3: Prepare the Trampoline
Inflate the trampoline using the supplied electric pump or a compatible external pump. The Island Hopper model inflates in approximately fifteen minutes, while the GIRISHIP model requires only three to five minutes due to its high‑flow pump. Verify that the foam perimeter padding is fully expanded, as it contributes to both comfort and structural integrity.
Inspect each D‑ring and eye bolt for any signs of wear before attachment. Tighten all factory‑installed bolts with a wrench to the torque specifications indicated in the user manual. A level placed on the central platform should read within ±2 cm to ensure even distribution of weight during use.
Step 4: Install Anchor Points
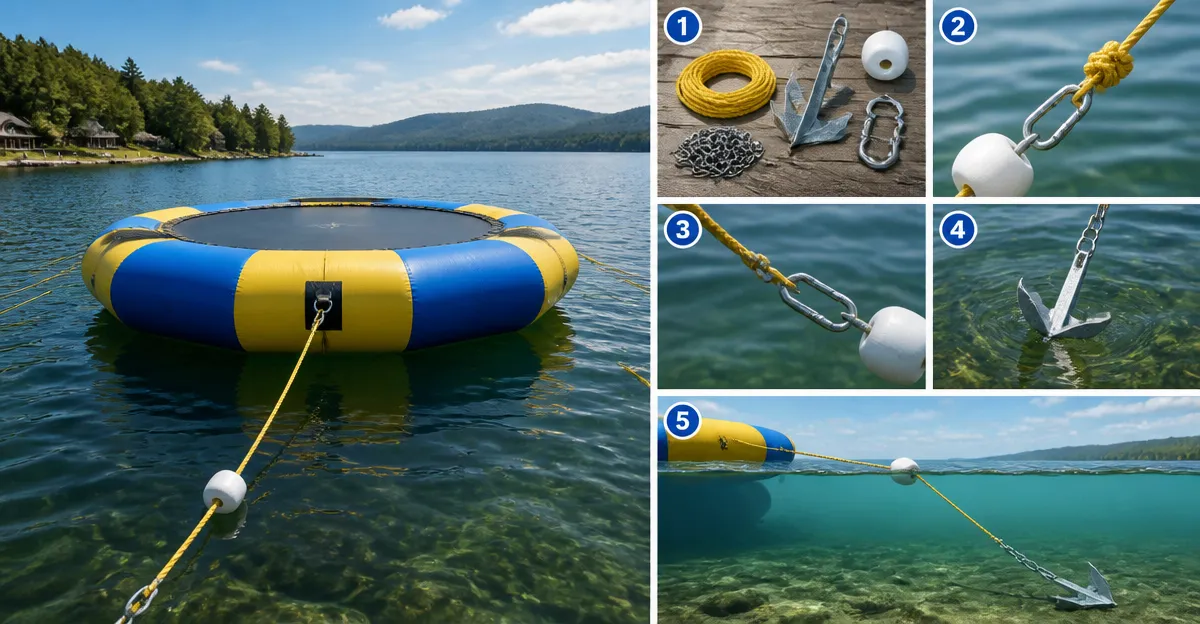
Attach a mooring rope to each D‑ring using a bowline knot, which resists slipping under tension. Feed the opposite end of the rope through the eye of a stainless‑steel anchor bag, then fill the bag with sand or water until it sinks to the bottom. For river applications where the bottom is rocky, consider using a concrete block with a pre‑drilled hole and a stainless steel shackle.
Secure the rope to the anchor bag with a cam‑buckle, allowing quick adjustment of tension. Pull the rope taut until the trampoline sits level on the water surface, then lock the cam‑buckle in place. Repeat the process for all six D‑rings on the Island Hopper, or for the four D‑rings on the GIRISHIP model.
The COOLWAVE Water Trampoline includes four reinforced handles and a rope ladder that simplify boarding; its included electric pump also speeds up setup. Priced at $339.00 with a rating of 3.9 / 5 from fourteen reviews, the COOLWAVE unit demonstrates reliable performance for medium‑size families.
Step 5: Test Stability and Adjust
Before allowing anyone to jump, gently push the trampoline from several sides to simulate wind and wave forces. Observe any lateral movement; if the platform shifts more than five centimeters, increase rope tension by tightening the cam‑buckles. Use a measuring tape to confirm that all anchor points remain equidistant from the center, preserving balance.
Check the water level around the trampoline; if the surface is too low, add additional ballast to the anchor bags. Conversely, if the platform rides too high, release a small amount of water from the bags to lower it. Conduct a final safety inspection of all knots, straps, and pump connections.
Tips & Pro Tips
- Always anchor on the leeward side of the wind to reduce drag on the platform.
- Use a wind‑speed meter; if gusts exceed 15 mph, consider postponing use until conditions improve.
- For river currents greater than 3 ft/s, install at least three anchor points per side to distribute force.
- Apply marine‑grade silicone sealant to any repaired D‑ring holes to prevent air leakage.
- Store mooring ropes in a dry container to avoid UV degradation.
Troubleshooting
Problem: The trampoline drifts after initial setup.
Solution: Re‑tighten all cam‑buckles, add an extra anchor bag, and verify that each D‑ring is correctly knotted.
Problem: Air leaks from a D‑ring after a storm.
Solution: Use the repair patch supplied with the GIRISHIP or COOLWAVE models, apply it to the cleaned surface, and inflate to the recommended pressure.
Problem: The ladder becomes slippery when wet.
Solution: Apply a non‑slip grip tape to the ladder steps; the COOLWAVE ladder already features a non‑slip design.
Conclusion
Anchoring a water trampoline safely requires careful site selection, appropriate anchoring hardware, and diligent tension adjustment. By following the five steps outlined above, users can enjoy hours of buoyant recreation while minimizing the risk of drift or structural failure. The recommended products provide reliable tools that simplify each phase of the process, yet the method remains effective with alternative equipment. Secure your platform, respect weather conditions, and the water trampoline will become a cherished centerpiece of summer activities.
Products Mentioned in This Guide
Frequently Asked Questions
What type of anchor is best for a water trampoline in a lake?
Heavy‑duty anchor bags or concrete blocks are preferred because they provide stable, low‑profile holding power in varying depths.
How thick should the mooring ropes be?
Use high‑strength ropes with a minimum diameter of 12 mm to resist tension and UV degradation.
Do I need stainless‑steel D‑rings or can I use regular eye bolts?
Stainless‑steel D‑rings or eye bolts are recommended to prevent rust and ensure a secure attachment point.
How often should I check the anchor tension during use?
Inspect and tighten the ratchet straps or cam‑buckles every 30 minutes, or after any wind or current change.
Can a portable electric pump be used to inflate the trampoline on site?
Yes, most models include a portable electric pump that quickly inflates the trampoline to the proper pressure before anchoring.